Wednesday, August 5, 2009

Cookies and Cream Cheesecake Cupcakes


If you have come here looking for light and fluffy, you will have to move on. If you have come here looking for a healthy recipe, please move on. If you have come here looking for "these will be good for me", you definately have to move on. But if you have come here looking for a pretty decadent, extremely rich and delicious cupcake, then please stay and read on. You are in for a treat. I just got a new cookbook. Martha Stewart's Cupcakes.. It is a great cookbook. It has the basics as well as so many different kinds of cupcakes ,this will be keeping me busy for awhile. These cheesecake cupcakes are out of this world. They are surprisingly easy and don't require anything that is probably not already in your house. I think the thing I love most about them is that instead of making a crust, one whole oreo serves as the base of each cheescake cupcake. Nice.


These little beauties start with these: How bad could they really be?


Cookies and Cream Cheescake Cupcakes


42 Oreos, 30 left whole, 12 coarsely chopped

2 lbs cream cheese, room temperature ( yes, 2 lbs)

1 cup sugar

1 tsp vanilla

4 large eggs, room temperature,lightly beaten

1 cup sour cream

pinch of salt

Preheat oven to 275.


Line standard muffin tins with paper liners. I found these really cool eco-freindly ones at the supermarket ( any little bit helps right?) They have a whole line of baking products, you can check it out here. The company is called "if you care". Check it out.


Place 1 whole cookie in the bottom of each lined cup.


Withan electric mixer on medium-high speed, beat cream cheese until smooth, scraping down sides of bowl as needed. Gradually add sugar, and beat until combined. Beat in vanilla. Add eggs, a bit at a time, beating to combine and scraping down the sides of the bowl as needed. Beat in sour cream and salt . Stir in chopped cookies, by hand.


Divide batter evenly among cookie-filled cups, filling each almost to the top. Bake, rotating tins halfway through, until filling is set, about 22 minutes.

Transfer tins to wire racks to cool completely. Refrigerate (in tins) at least 4 hours or up to overnight. Remove from tins just before serving.

How cool do the bottom of these look. I love that you can see the oreo thru the liner.These are wicked good and very rich. They were gone before I knew it. They were creamy and oh so good. These are as keeper worthy as anything I have ever made and the kicker is they were really easy to make. So if you are looking for something a little different for your next party or just want a little something something that will blow you away and make you feel like hitting the treadmill for a 1/2 hour after you are done, look no further, you have arrived. ENJOY!!!

Sunday, August 2, 2009

I want to be Ina for a day and her Homemade Granola Bars

I want to be Ina Garten. Just for one day, I want to be The Barefoot Contessa. I want to live in a huge house in The Hamptons, have a brand new barn built as my new kitchen, I want to flit around town and go the the coolest food stores, where everyone knows my name. I want all my food to always look and taste as fabulous as hers does. I want to have fab friends who are always having parties and need my help to make it perfect. I want her collection of white dishes. It also wouldn't be bad to have a husband who works in another state during the week and only comes home on weekends. Oh, what a perfect wife I would be then. (just kidding, honey!!) I want her collection of pots and pans and her beautiful herbs that are waiting so patiently on her counter for her to use. I love Ina and how idyllic her life seems, but I would only trade it for one day, because I would miss my own disorganized, chaotic and kid filled life too much. A girl is allowed to dream. Now that I got that off my chest, I can move on to her Homemade Granola Bars, the original recipe can be found here. I saw her make these last week on TV and had to make them immediately. They were easy and so good and the ingredients can be interchangeable, I think, so if you don't like something, change it to something else. A Barefoot Contessa recipe has never let me down, and this one is no different.


Homemade Granola Bars


2 cups old fashioned oatmeal
1 cup sliced almonds
1 cup shredded coconut, loosely packed
1/2 cup wheat germ ( I did not use, because I didn't have any)
3 tbsp unsalted butter
2/3 cup honey
1/4 cup light brown sugar, lightly packed
1 1/2 tsp vanilla
1/4 tsp salt
1/2 cup chopped,pitted dates
1/2 cup chopped, dried apricots
1/2 cup dried cranberries


Directions:

Preheat oven to 350.

Butter an 8x12 inch baking dish and line it with parchmant. I used a 9x13 and it was perfect. Do not skip on the parchmant paper, it will help you remove these later.


Toss oatmeal,coconut and almonds together on a sheet pan and bake 10-12 minutes, stirring occasionally, until lightly browned.

Transfer to a large bowland stir in wheat germ. Reduce oven to 300.

Place butter,honey,brownsugar, vanilla and salt in a small saucepan and bring to a boil over medium heat.


Cook and stir for a minute, then pour over oatmeal mixture. Add the dates, apricots and cranberries.


Stir very well.


Pour the mixture into prepared pan, please use the parchmant paper. Wet your fingers and lightly press the mixture evenly into pan.


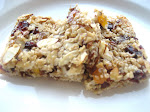
Looks good, no? Bake 25-30 minutes, until lightly browned. Cool at least 2-3 hours before cutting into squares. Serve at room temperature.


The parchmant paper made this so much easier for the whole thing to come out when I flipped it over.


These were so good and my coworkers inhaled them. I was really impressed. They were so easy to make and they made alot and I think for the upcoming school year they would make a great snack or quick breakfast. I think you could substitute any dried fruit or nuts you like to make it work for you, but definately try them. They are a keeper.


As you can tell by my picture, I did not let them sit for 2-3 hours, so they drooped a little for this shot. Ina would have never done that, she would have known better. Oh well.


Friday, July 31, 2009

Chocolate Peanut Butter Cookie Duo

I had to do it, I just had to. I just saw these cookies yesterday over at Jenny's blog, Picky Palate, I just knew I would have to make these ASAP. I am sure you are all familiar with Picky Palate, she has the most amazing things and her pictures are always awesome, so please go visit her, if you don't already. You will be sorry if you don't. You will be missing out on things like these cookies.The combo of chocolate and peanut butter is a big hit in our house and I love that I had everything on hand to make them. The Peanut Butter cookie dough has only 3 ingredients, 3 people, does it get easier than that. Here we go.


Chocolate Peanut Butter Cookie Duo


Peanut Butter Cookie dough

1 cup creamy peanut butter
1 cup sugar
1 egg


Mix all together in a bowl until well combined, set aside


Seriously, how hard is that?


Chocolate chocolate chip Cookie


1 cup butter, softened
1 cup sugar
3/4 cup brown sugar
2 eggs
1 tsp vanilla
1 3/4 cup flour
1 1/4 cup hersheys cocoa
2 tsp baking soda
1/2 tsp salt
1 cup chocolate chips


Preheat oven to 350.

Cream butter and sugars until well combined. slowly beat in eggs and vanila until well combined.

Place flour,cocoa,baking soda and salt into a bowl, mix with fork .

Add to wet ingredients along with chocolate chips, until just combined.

You will end up with these two doughs, yummy.


To Form Cookies:

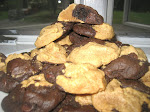
Take 1 tablespoon of peanut butter dough and a tablespoon of choc cookie dough and gently press them together, forming a " not so perfect ball". Don't press too much, just stick them together and place on silpat or parchmant paper lined baking sheet.

Bake for 9-11 minutes or until cookies are cooked how you like them. Let cool 5 minutes before removing them to cooling rack. Enjoy, with a big, ice cold glass of milk.


These cookies are so cool. They look great. They were big and chewy and you could definately taste both flavors. These will become a regular in my house.

I think the next time I will double the peanut butter dough, because it didn't make as much as the chocolate cookie dough. It worked out ok though, I just used the leftover chocolate dough to make delish chocolate chocolate chip cookies, that were awesome as well.


Monday, July 27, 2009

I'm back...with Everything LoMein

Hey everybody. I am back from the Jersey Shore,vacation was great, good weather,good friends and lots of sun at the beach but I swear it's like I never left. The kids are fighting, I am swamped at work and I am so far behind on commenting that I feel as if I am drowning. But never fear, I will catch up and I am sharing a really good recipe with you. This is a Rachael Ray recipe, I know, I know, some of you love her and some of you hate her, just deal with it and you will get something really good when it's done.The original recipe can be found here. I don't know why there are such RR haters out there. If you really look at her recipes, they are full of veggies and good stuff. So, for me, do me a favor, don't turn away , just read through and you might be surprised. My sister has made this recipe and I really was scared to try it. The ingredient list is long, and there is alot of prep work. There were a few things I did have to pick up at the store, but if you prep everything ahead of time, it comes together really quick.


Everything Lo Mein


Sauce:

3 rounded tbsp hoisin sauce

3 tbsp dark soy sauce(tamari)

3 tbsp water

2 tsp hot sauce( I used red hot)


* I doubled the sauce


Everything Lo Mein


3/4 pound spaghetti

salt

1/4 cup vegetable oil, divided

2 large eggs, beaten ( I used 4)

3 chicken cutlets, thinly sliced into strips

3 thin cut pork chops, thinly sliced into strips

black pepper

2 tsp ground coriander

2 inches fresh ginger, peeled and chopped or grated

4 garlic cloves, minced

6 scallions, cut into 3 inch lengths, then sliced lengthwise

1/2 pound shitake mushrooms, chopped

1 red bell pepper, cut into quarters,seeded,and sliced into strips

1 small can sliced water chestnuts,drained

1/2 pound shredded cabbage ( i used Napa)


Mix together sauce ingredients and reserve.

Bring pasta water to a boil, salt water, and cook spaghetti to al dente. I used this brand pasta.


It is a little more expensive, but it is better than whole wheat pasta and has a low glycemic index and honestly I couldn't taste the difference and I felt better for eating it.


Heat 1 tbsp vegetable oil in large non stick skillet. Scramble the eggs, remove and reserve.

Season the meat with salt,pepper and coriander.


Heat remaining oil to a ripple, then add meat and stir fry for 4 minutes. Remove to a plate and keep warm. Add ginger,garlic, and veggies to pan.


Stir fry veggies for 2 minutes, or to your liking, then drain and add pasta and eggs back to skillet. Return meat to the pan. Pour sauce over all and toss to combine. Remove from heat and let the liquids absorb a little.


This makes enough to feed a small army and it tastes so much better the next day. I love chinese food but making your own will make you feel better about what you are feeding everyone. So let go of your misconceptions or just your annoyance with Rachael Ray and just give it a try, Please. For me.


Just for fun I am adding in some random pics. Here is our brand new stone patio, we just had put in on Saturday. I love it. Now I need patio furniture.


Here we are at the beach. The girls had an awesome time. I hope they remember these vacations, because they mean so much to me. Especially this one, my oldest lost her first tooth while we were away. I still cannot believe she is old enough for that to have happened.


And of course, here is my sister, Donna, of My Tasty Treasures and her FFH, who joined us for a day at the beach. Aren't they cute?


And finally, here I am , with my girls.


It was a great trip, but I am happy to be home. I missed all your posts and am anxious to catch up on all the good things that were made while I was gone.


Thursday, July 16, 2009

Vacation and Orange-Cranberry Walnut Loaf

Well it is that time of Summer. We are going off on vacation. We rent a beach house every year down the Jersey Shore. The girls are at a perfect age to enjoy the beach, the boardwalk and all the goodtimes we hope to have. I will be back in a wekk or so, so I am leaving you with one of my favorite breads, Orange- Cranberry Walnut Bread. Is it a bread or a poundcake, I don't know, I don't care, all I know is that is is really good and the smell it makes in your home while baking, well you will just have to see for yourself. How could anything that starts with these ingredients be bad? This recipe comes from Good Things Catered. Her blog is really good, full of tons of great recipes. Check her out if you haven't already. There are so many things on there that I want to make and if they are all as good as this bread, I am hooked. The recipe is for 2 loaves, so cut it in half if you only want one. Or do what I did. You'll see. Be patient.


Orange- Cranberry Walnut Loaf

3 cups flour
2 tsp baking powder
1/2 tsp salt
zest of 2 large oranges
zest of 1 large lemon
1/2 cup milk
1/2 cup freshly squeezed orange juice
12 tbsp unsalted butter,softened
1 1/3 cup sugar
4 large eggs, slightly beaten
1 tsp vanilla

1 1/3 cup chopped walnts

2/3 cup finely chopped dried cranberries

Directions:

Preheat oven to 350 and prepare loaf pans, spray with baking spray

In a large bowl,combine flour,baking powder and salt and whisk to combine; set aside

In medium bowl, combine milk,orange juice,zests,a nd whisk to combine; set aside

In bowl of stand mixer, combine butter and sugar and beat on high speed until light and fluffy in texture, about 3 minutes

Reduce speed to medium and incorporate eggs, one at a time,beating each until fully combined before adding another

Add vanilla and beat to combine

Reduce speed to low and add flour mixture in three parts, alternating with milk mixture, starting and ending with flour and mixing until incorporated.

Remove bowl from mixer and fold in walnuts and cranberries. Doesn't it look good so far?

Scrape batter into prepared pans and spread evenly.

Place in oven and bake until golden brown and toothpick inserted comes out clean, 35- 40 minutes, for mini loaves and 45-50 minutes for full sized loaves. Or if you don't want 2 loaves, do what I did, make 1 loaf and 12 muffins.

If you make muffins, only bake 12-15 minutes, keep an eye on them. Let cool in pan for 10 minutes and remove and cool on rack. Cool completely before serving.


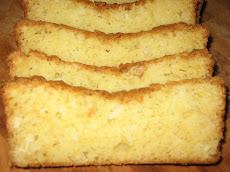
I couldn't cut open the bread to show you because it was a thank you gift for someone I work with. But trust me the smell is amazing and it is so pretty when cut open.


You know what I can show you, here are the muffins. Aren't they pretty?


This recipe comes out very moist and would be great for brunch or as a gift for the holidays, especially Christmas, with those festive red cranberries. So everyone have a great week and I cant't wait to see what you all will have done when I was gone.


Here is the top of my bread. What, I told you I couldn't cut it.....lol.

Monday, July 13, 2009

Melt in your mouth BBQ ribs

I cannot lie. I have always been intimidated, let's be honest, just plain scared to try and make BBQ ribs. Let's face it, I live in New York and we are not known for our bbq ribs. But I love them so much and was determined to find a way to make them, and did I ever. These ribs are as advertised, melt in your mouth. I don't think it is so much the recipe but the method. Let me share with you. The original recipe comes from Recipezaar, I have adjusted a few things and my changes are in parenthesis.


Melt in your mouth BBQ ribs


4lbs pork ribs ( I used Baby Back, from costco)

3/4 cup brown sugar

1 tsp hickory salt ( i used regular kosher salt)

1 tbsp paprika

1 tsp cumin ( my addition, not in original recipe)

1 tbsp garlic powder

1/2 tsp ground red pepper ( optional, I did not use)

2 cups favorite BBQ sauce ( i use Sweet Baby Rays)


The Method:


Pre heat oven to 300.

Peel off tough membrane that covers the bony side of the ribs.

Mix together sugar and spices to make the dry rub.

Apply rub to ribs on all sides.


Lay ribs on 2 layers of foil, shiny side out and meaty side down. Lay 2 layers of foil on top of ribs and roll and crimp edges tightly, edges facing up and seal. At this point, I put them in the fridge and let them marinade in the rub for 4-6 hours.


Place on baking sheet, or as I did, use throw away aluminum pans, in case rub leaks. Bake 2-3 hours, I did 3, until meat is starting to shrink away from the ends of the bone.


STOP. Right here at this point, you are good. You can eat them now, they are soooo good. But let's keep going and go for the gusto with the big finish. Remove from oven, unwrap ribs and apply BBQ sauce to both sides and carefully put on the grill. I say carefully, because at this point they are so tender they will fall apart if not handled with care. So, handle with care.


I was, once again, lucky enough to have my hubby man the grill, and grill those babies for 5 minutes on each side. Apply more BBQ sauce if you like. And please use a silicone brush. Dear hubby is old school and has a bristle brush and I was picking strands off my ribs all through dinner. It's time to embrace the 20th century, honey. Hurry up and join the rest of us. Good Lord. Very carefully remove ribs from the grill.


Get lots and lots of napkins and wet wipes and get to it. These are truly awesome and I love the easy clean up and the minimum effort these ribs require. So go forth and conquer your fear of BBQ ribs. I have and if a woman from New York can make Good ,old fashioned, messy,sticky ribs, you can too. Don't let me down.


Can you smell them?